I think everyone of you knows a game with a scrolling background. You, as a programmer, can use scrolling for many different reasons. For example the game area can be much bigger than the part of the game area which can be seen by the player at once (I'll call this part "field of vision" in this chapter). Let's think of a little shooting game like my game UfoAttacks, where I used a scrolling screen for the first time in a java applet. As soon as the player moves the mouse to the left or the right border of the applet, his field of vision is moving in this this directory. In this chapter I want to explain to you, how you can implement such a behavior.
Everytime we used static objects in our games so far, such as borders, stones..., these objects didn't change their position during the whole game (that's why I call them static objects ;-). Only moving objects changed their position. Now, we have to say goodbye to this pretty simple view of object positions and as soon as we did so, we've already found the solution to our scrolling problem. In a game, we want to use scrolling, no object has a static position, but every object changes it's position during the scrolling process.
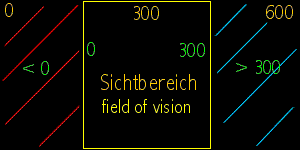
This picture shows the situation at the beginning of the applet. The yellow numbers show you the game area positions of the objects, the green numbers show the relative position belonging to the actual position of our field of vision. All objects in the blue area have a relative position > 300, in the red area all relative positions are < 0. All objects with a relative position in the range of 0 to 300 are painted in our field of vision, all the other objects are painted outside of the applet area.
Ok, now we are scrolling to the left side. This means that we have to add our scroll speed to the relative position of every object, which means, all objects are moving to the right side of the applet. That way, some stars will disappear at the right side, because their relative position gets greater than 300, other stars will appear at the left side of the applet because their negative relative position (at the beginning of the applet) is getting > 0.
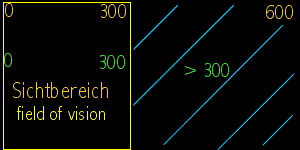
This picture shows the situation after scrolling to the left. Our field of vision has moved to the left border of the game area, that's why there are no objects left that have relative positions smaller than 0. The number of objects with a relative position higher than 300 has increased. Numbers and colors have the same meaning as in the picture above
I hope, you realized now, that the relative position of a object is not the same as the game area position of the same object. Let's take a look at the borders of the game area, for example. As I said, our game area has a width of 600 pixles. At the start of the applet, we see the middle of the game area. This means the left border of our field of vision is the game area position 150. But the left border of the game area is located 150 pixles more to the left and has a relative position of -150. The right border of the game area is placed 150 pixles more to the right than the right border of the applet and has the relative position 450. So we can define a little calculation formula, we can use to initialize all the game objects. This formula returns the correct relative position to a given game area position as long as we view the middle of the game area at the start of the applet!
As I said, the only difference to other, non scrolling games is, that every object is moving, when the screen is scrolled and that the game area positions of the objects might be initialized in a different way (see above). So every object in our game has a method scrollObject (int speed). This method adds the scroll speed to the actual x - position of the object, so that the object is moving in the correct direction.
The applet itself is scrolled using a method called scrollGame(int speed). This method is called everytime the thread is executed and calls (if the scroll speed is not equal 0) the scrollObject - method of every game object (in our example applet the stars in the stars array and the ufo).
Objects that are moving can be moved the same way as always, just take care that these objects are scrolled too additionally to their movement!
In the example applet to this chapter you can find both kinds of objects (moving ones and static ones). Stars and borders (blue) represent static objects that change their positions just by scrolling. Additionally there is a little Ufo flying around, to show you how to handle moving objects. The numbers are just there for your orientation and show the positions of the middle of your actual field of vision and the relative positions of the left and the right border of the game area. All the other stuff in the sourcecode shall be selfexplaining, if you understood the idea, it will be no problem for you, I hope that I was able to help you a little bit, here come the links to the sourcecode and the example applet, have fun!
SourceCode download
Take a look at the applet